WooCommerce PAYCOMET Module
Download Link
The module can be downloaded from the following link: WooCommerce
Module Configuration
PAYCOMET client area
Important
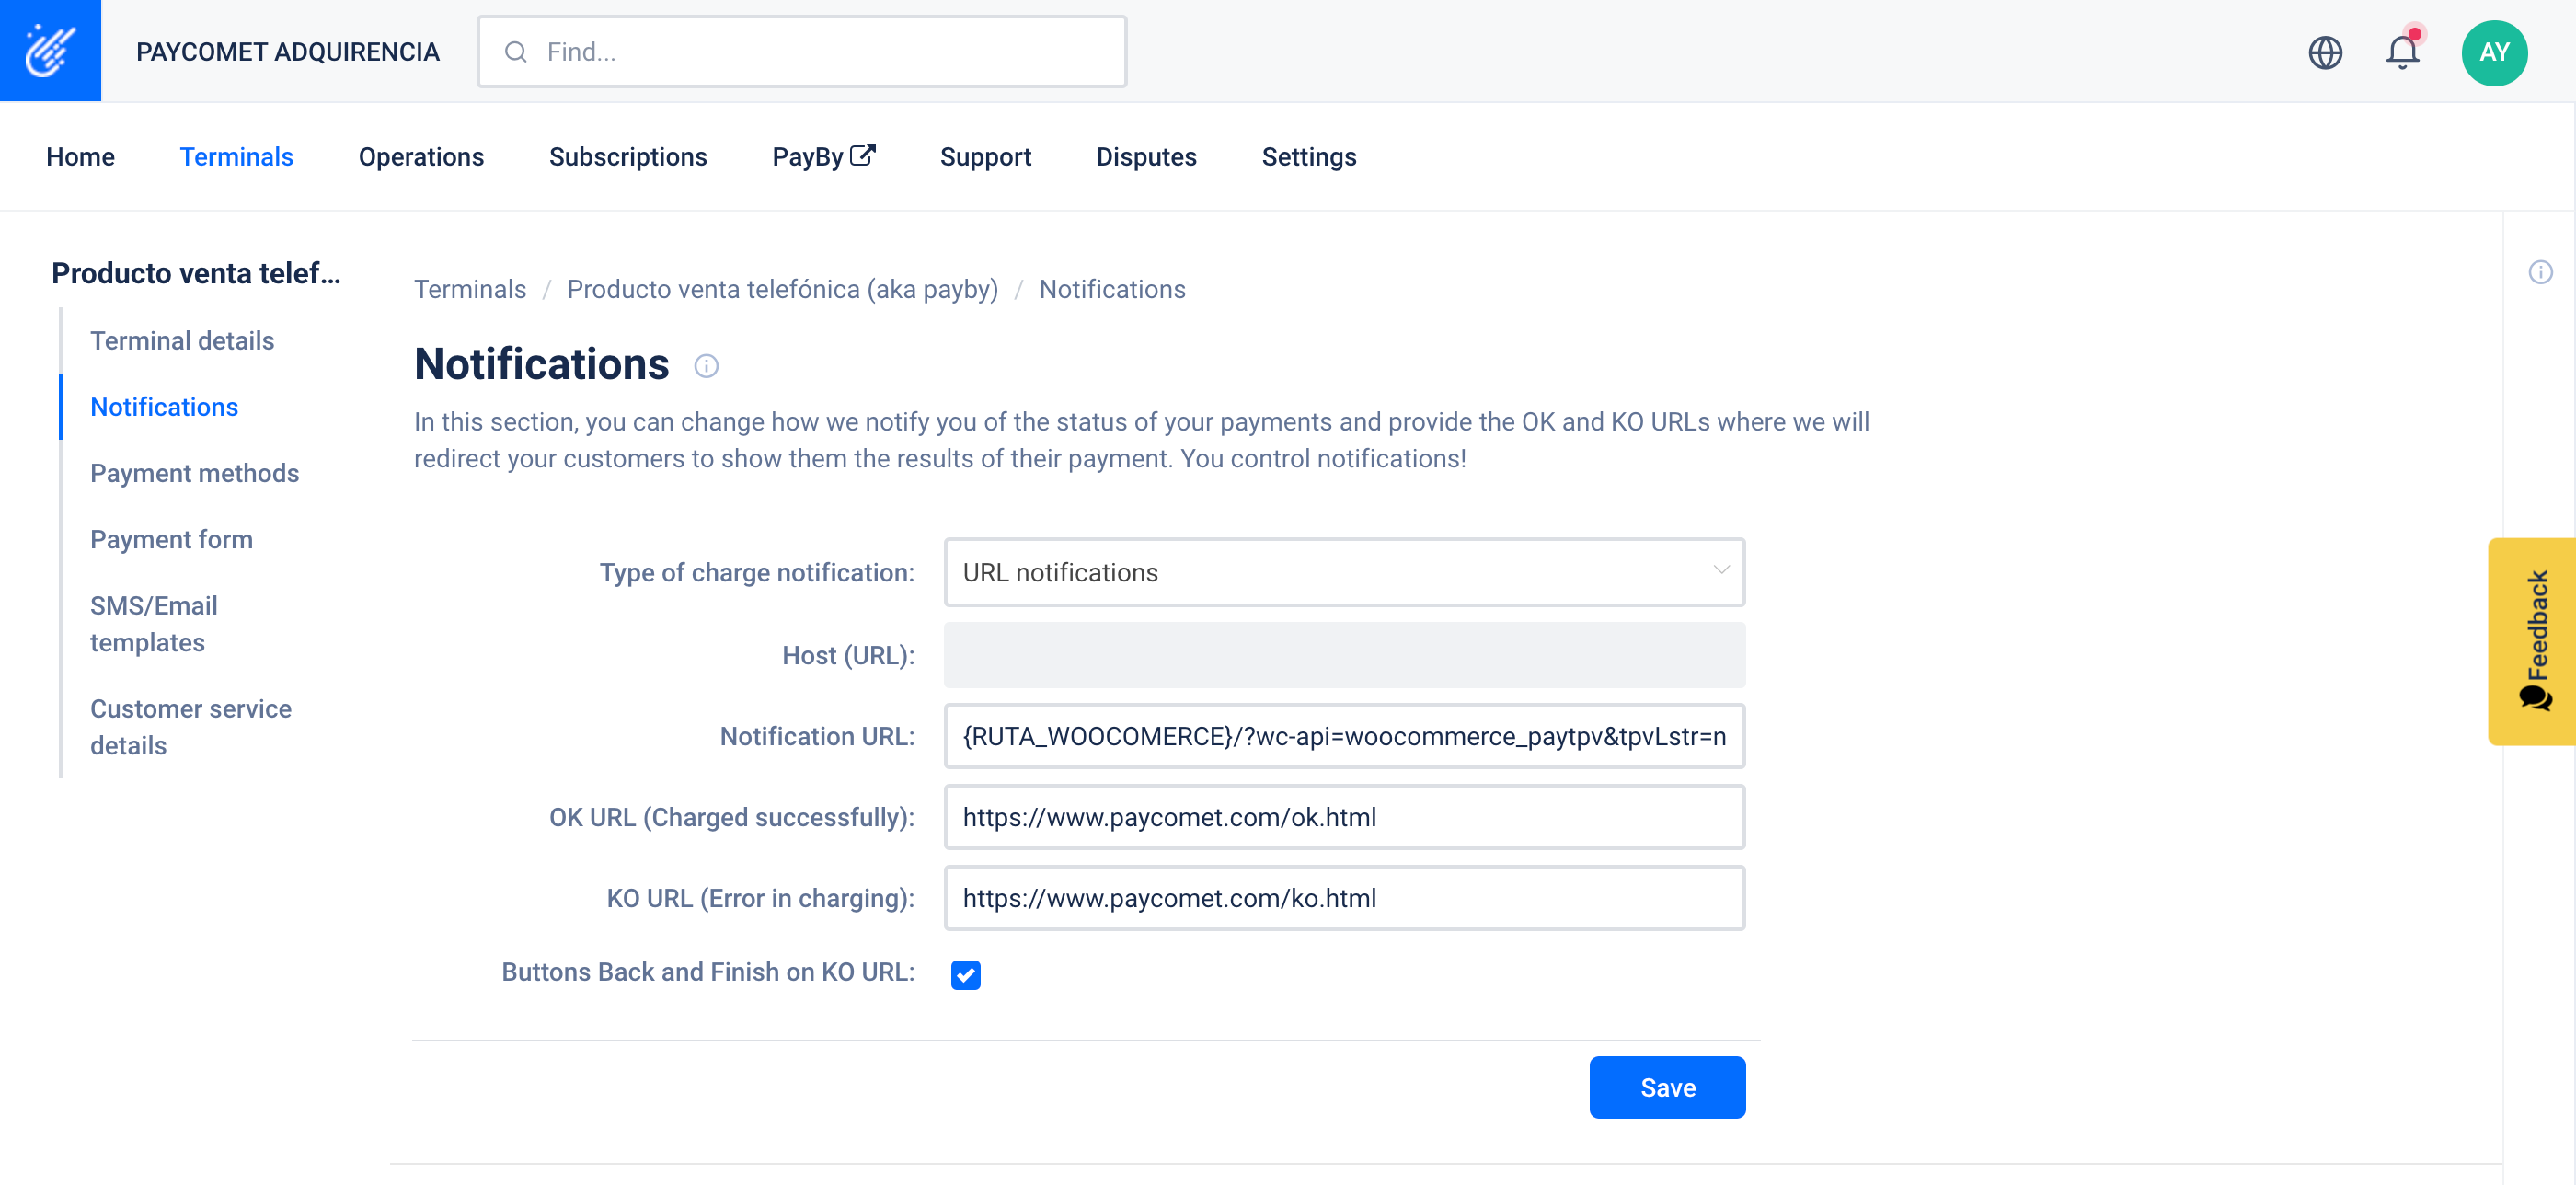
So that everything operates properly, it is VERY IMPORTANT to configure the next options on your client area. You must setup the following info:
- Type of charge notification: select Notification by URL or Notification by URL and by email.
- URL Notification: insert the following:
https://{WOOCOMERCE_PATH}/?wc-api=woocommerce_paytpv&tpvLstr=notifyReplace {WOOCOMERCE_PATH} with the URL of your store.
WooCommerce
Below the PAYCOMET Plugin configuration is explained for Woocommerce
When we install the plugin in Woocommerce, the following information is shown.

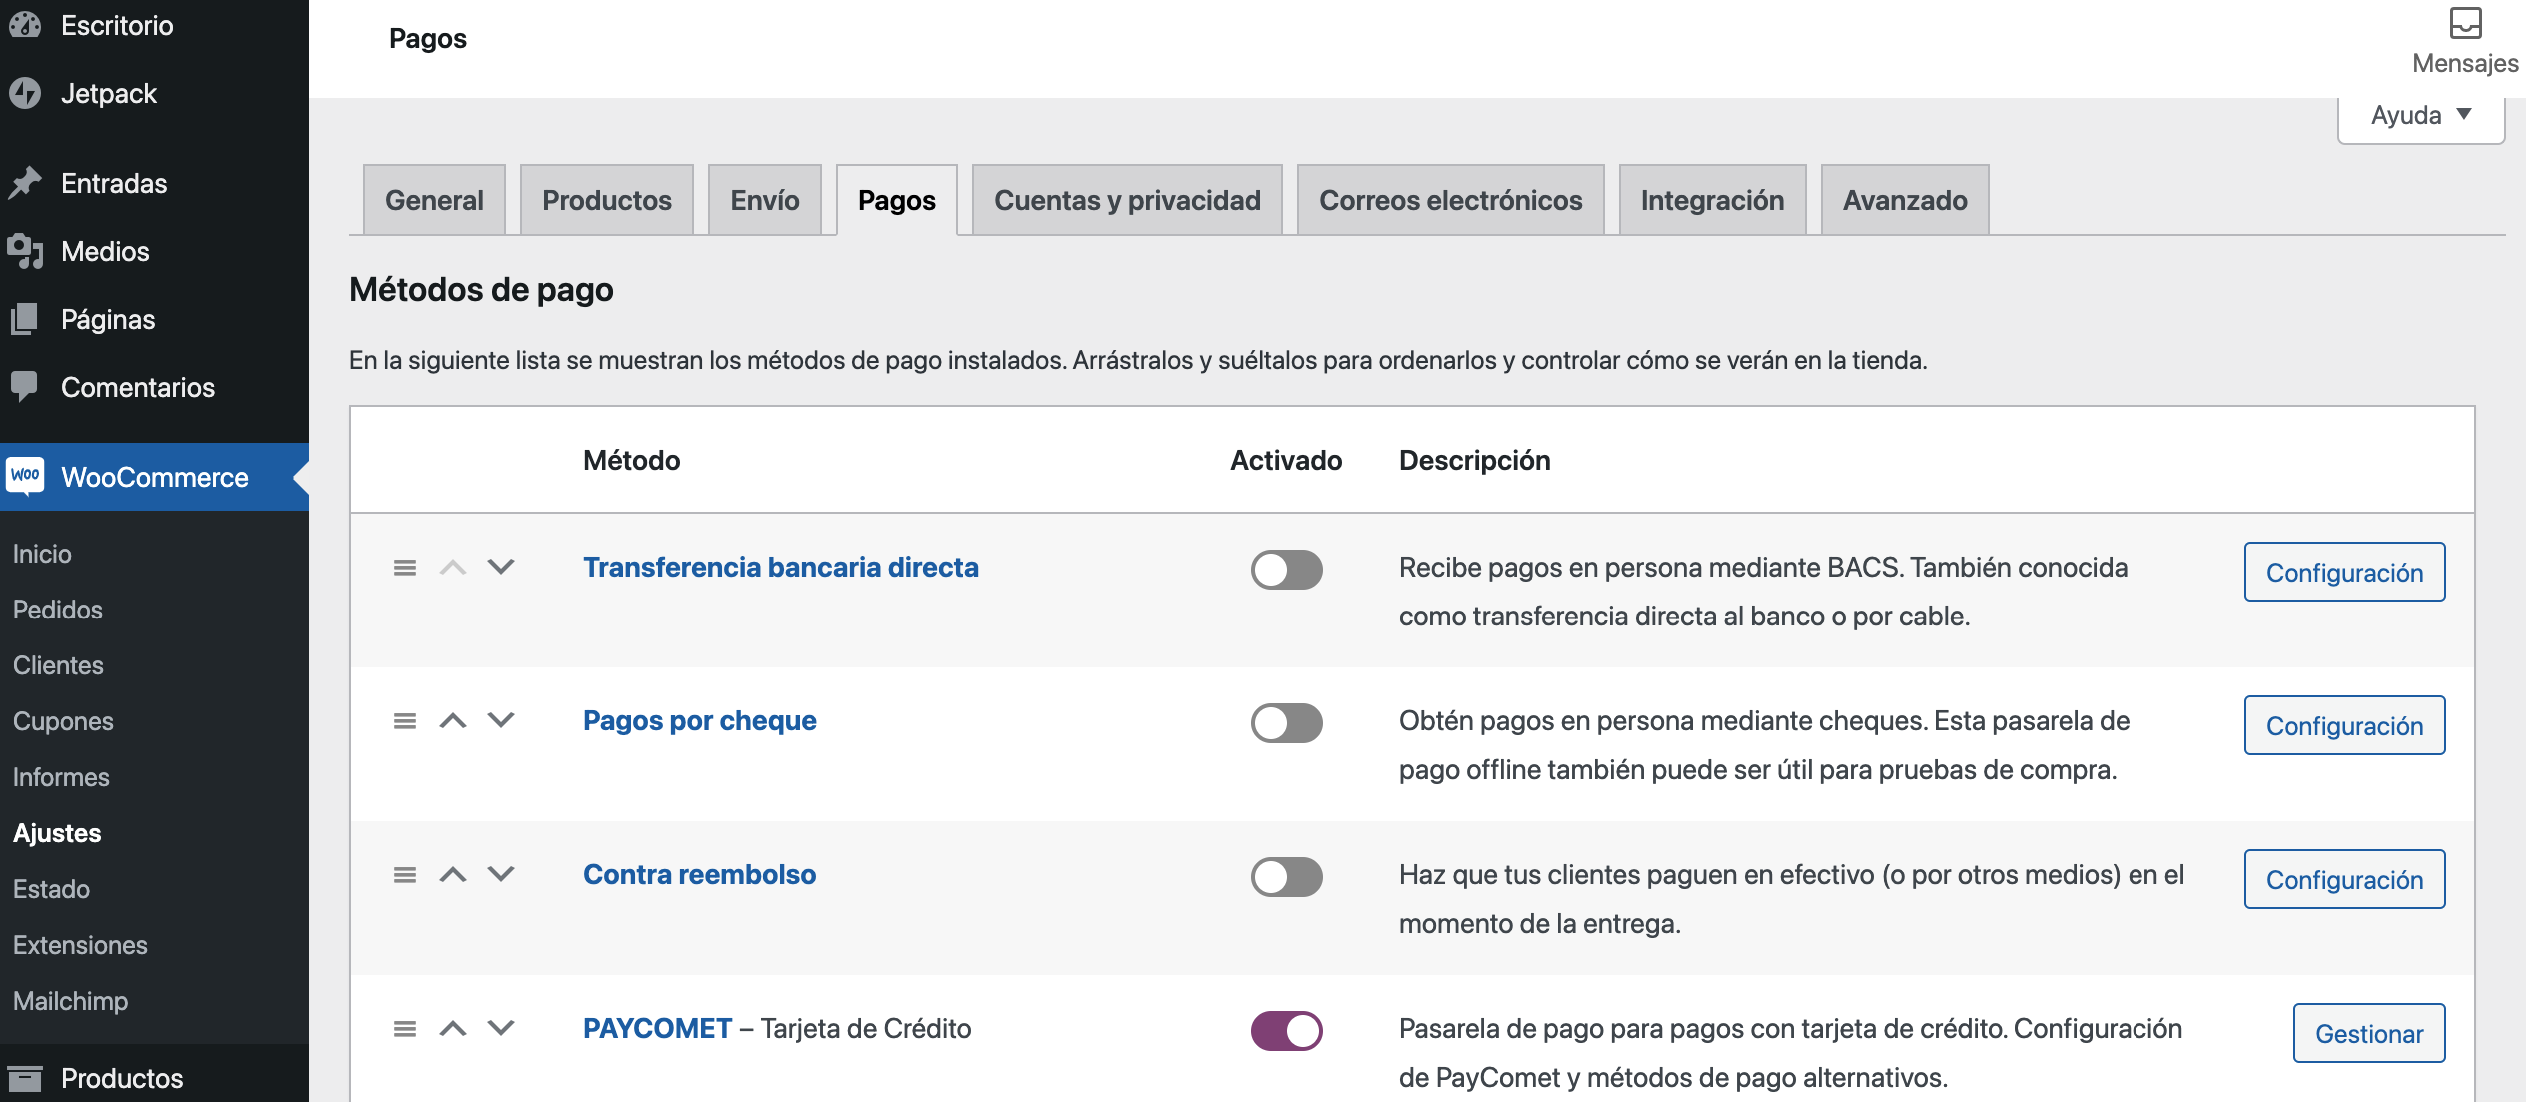
In the WooCommerce Settings section, clicking on the PAYMENTS tab, we will select the Manage option of PAYCOMET option, to access the payment method settings.
The configuration parameters are as follows:
- Title: Name of the payment method that the customer will see in the checkout process.
- Description: Descriptive text accompanying the name of the payment method that will be seen by the customer.
Moreover, the client code must be entered, provided in the product configuration in the PAYCOMET client area. This field is:
- Client code
- API KEY: It is necessary to include the Api Key that you have generated from your control panel. In the following link you have the information to generate it.
For each terminal that the user has in the corresponding currency, the following will be defined:
- Terminal Number: Appears in the PAYCOMET client area
- Password: Appears in the PAYCOMET client area.
- Currency: Terminal Currency. The default currency of the store. The currency associated with the terminal contracted in the bank must be indicated.
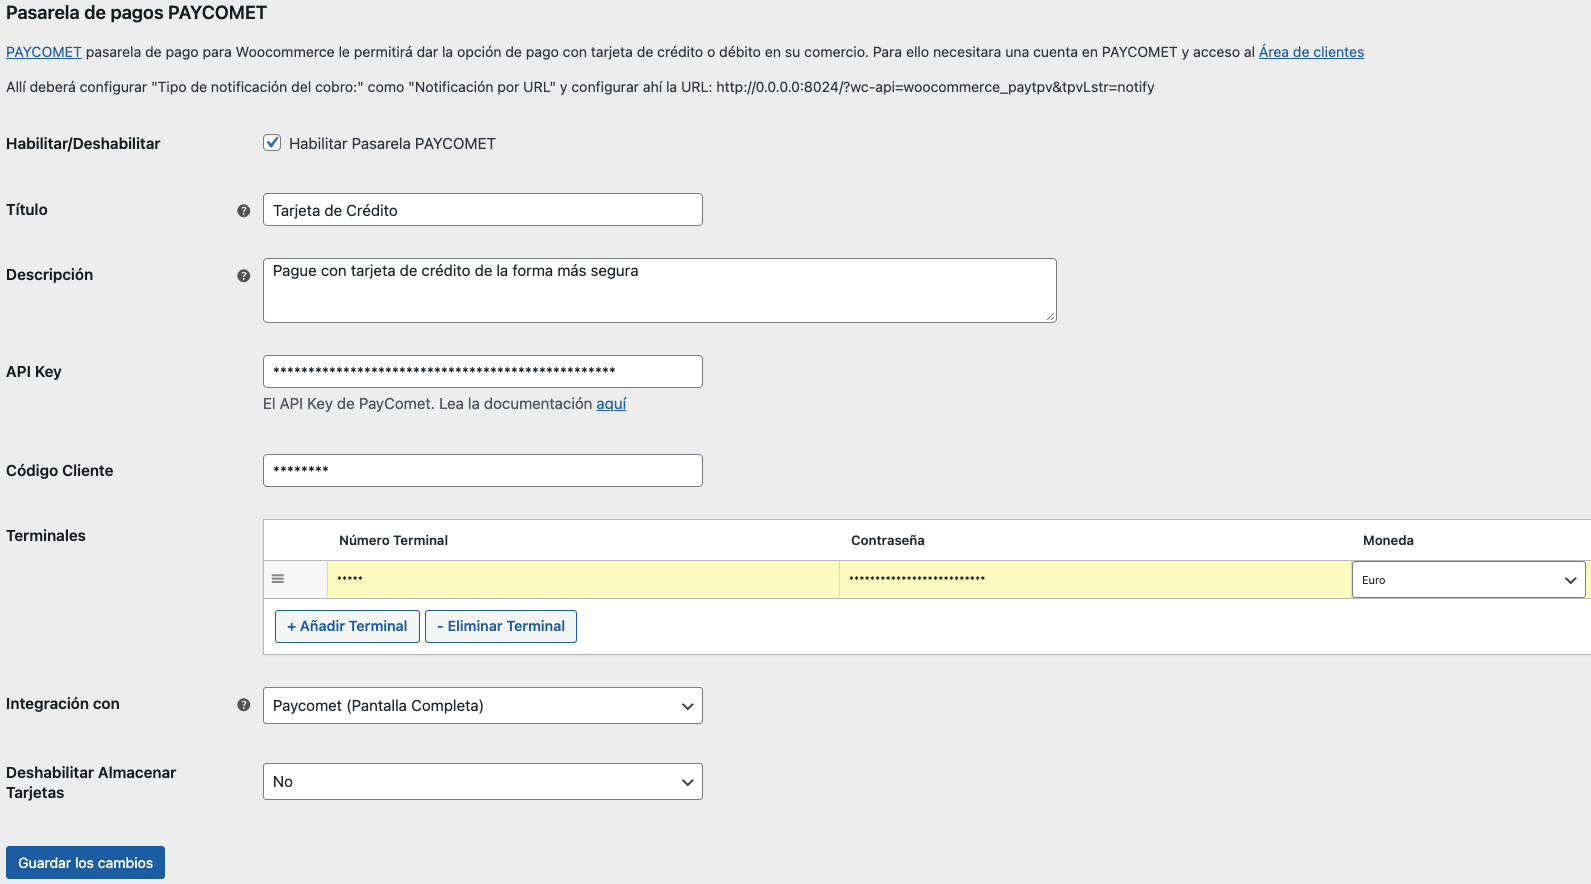
Up to 3 terminals can be defined, each one associated with a different currency.
To add a new terminal, simply click the button and a new terminal line will be shown for adding the new terminal information.


Two terminals with the same Terminal Number cannot be created.
Two terminals with the same Currency cannot be created.
If it is desired to remove a configured terminal, we will click the button. It will then be necessary to click Save Changes so that the changes are applied.

If more than one terminal is available and configured, payments will be made by the terminal associated with the order currency.
If only one Terminal is available and it is desired to operate with different Currencies this is also possible. You must contact PAYCOMET to enable the Multicurrency option on the terminal. In this case, the module sends the total amount of the operation to the Bank in the currency of the order and the Bank will make the conversion into the Terminal currency.
Configuration options:
- Disable Card Storage: If you want card storage to be disabled. This will remove the "Save Card" option when making a payment with a new card and also will remove "My Cards" section in "My Account" tab.
- Integration with: Allows you to choose where the checkout will be displayed. "Iframe" will display it on the same page of the merchants website, without a redirect. "Paycomet (Fullscreen)" redirects on a new full-size screen external to the merchants website. "Jet Iframe" will appear directly on the checkout screen.
- JET ID: Appears in the PAYCOMET client area. Its mandatory just in case of choosing the JetIframe integration.
- Iframe Height (px): If "Payment in: iframe" has been chosen, this option will be shown, which allows adjusting the height of the checkout window.
- PAN Div Style: If "pay in: jet-iframe" has been chosen, this option is displayed, which allows you to change the style (using CSS) of the PAN Div tag.
- PAN Input style: If "pay in: jet-iframe" has been chosen, this option will be displayed, which allows you to change the style (using CSS) of the PAN Input tag.
- CVC2 Div Style: If "pay in: jet-iframe" has been chosen, this option will be displayed, which allows you to change the style (using CSS) of the CVC2 Div tag.
- CVC2 Input style: If "pay in: jet-iframe" has been chosen, this option will be displayed, which allows you to change the style (using CSS) of the CVC2 Input tag.
Validations
When enabling the module, the module will contrast the information against PAYCOMET verifying that the configuration is correct, the notification url exists and it responds correctly.
If there is an error, a message will be indicated and the module will not be enabled. You must correct them before you can activate it.
If you have any questions you can contact PAYCOMET.

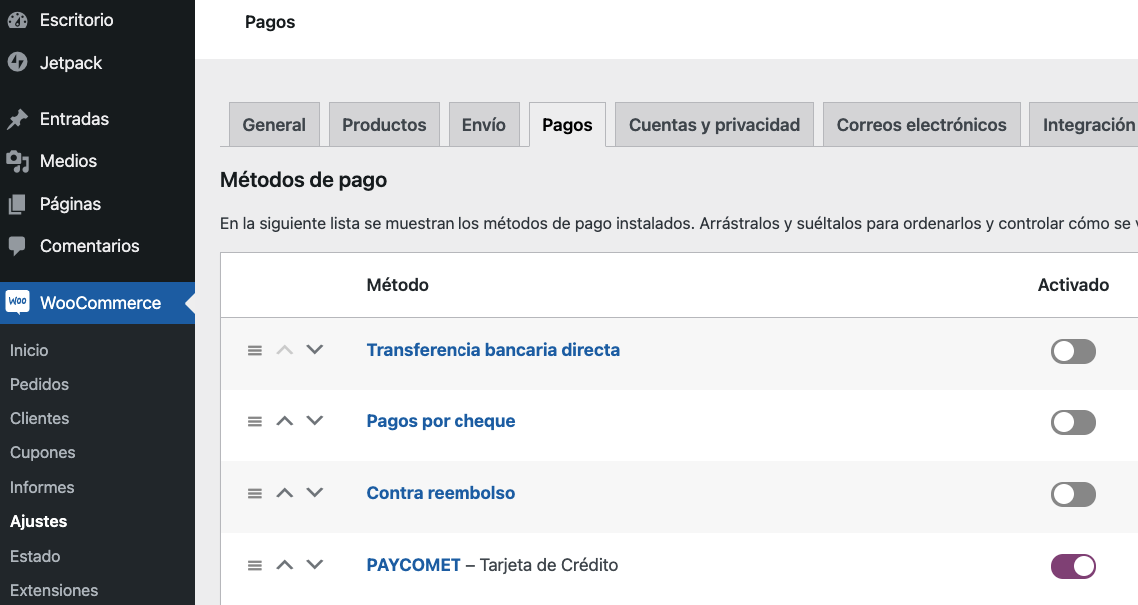
Next, another option to activate the module is shown, from Payment Methods, click on the Activated selector and it will be displayed as in the following image:
APMS
In order to check all available APMS, please click on the following link: Payment Methods
In the WooCommerce Settings section, click on the PAYMENT tab and select the PAYCOMET Settings - XXXXXXXXXXXXX option to access the APM configuration.
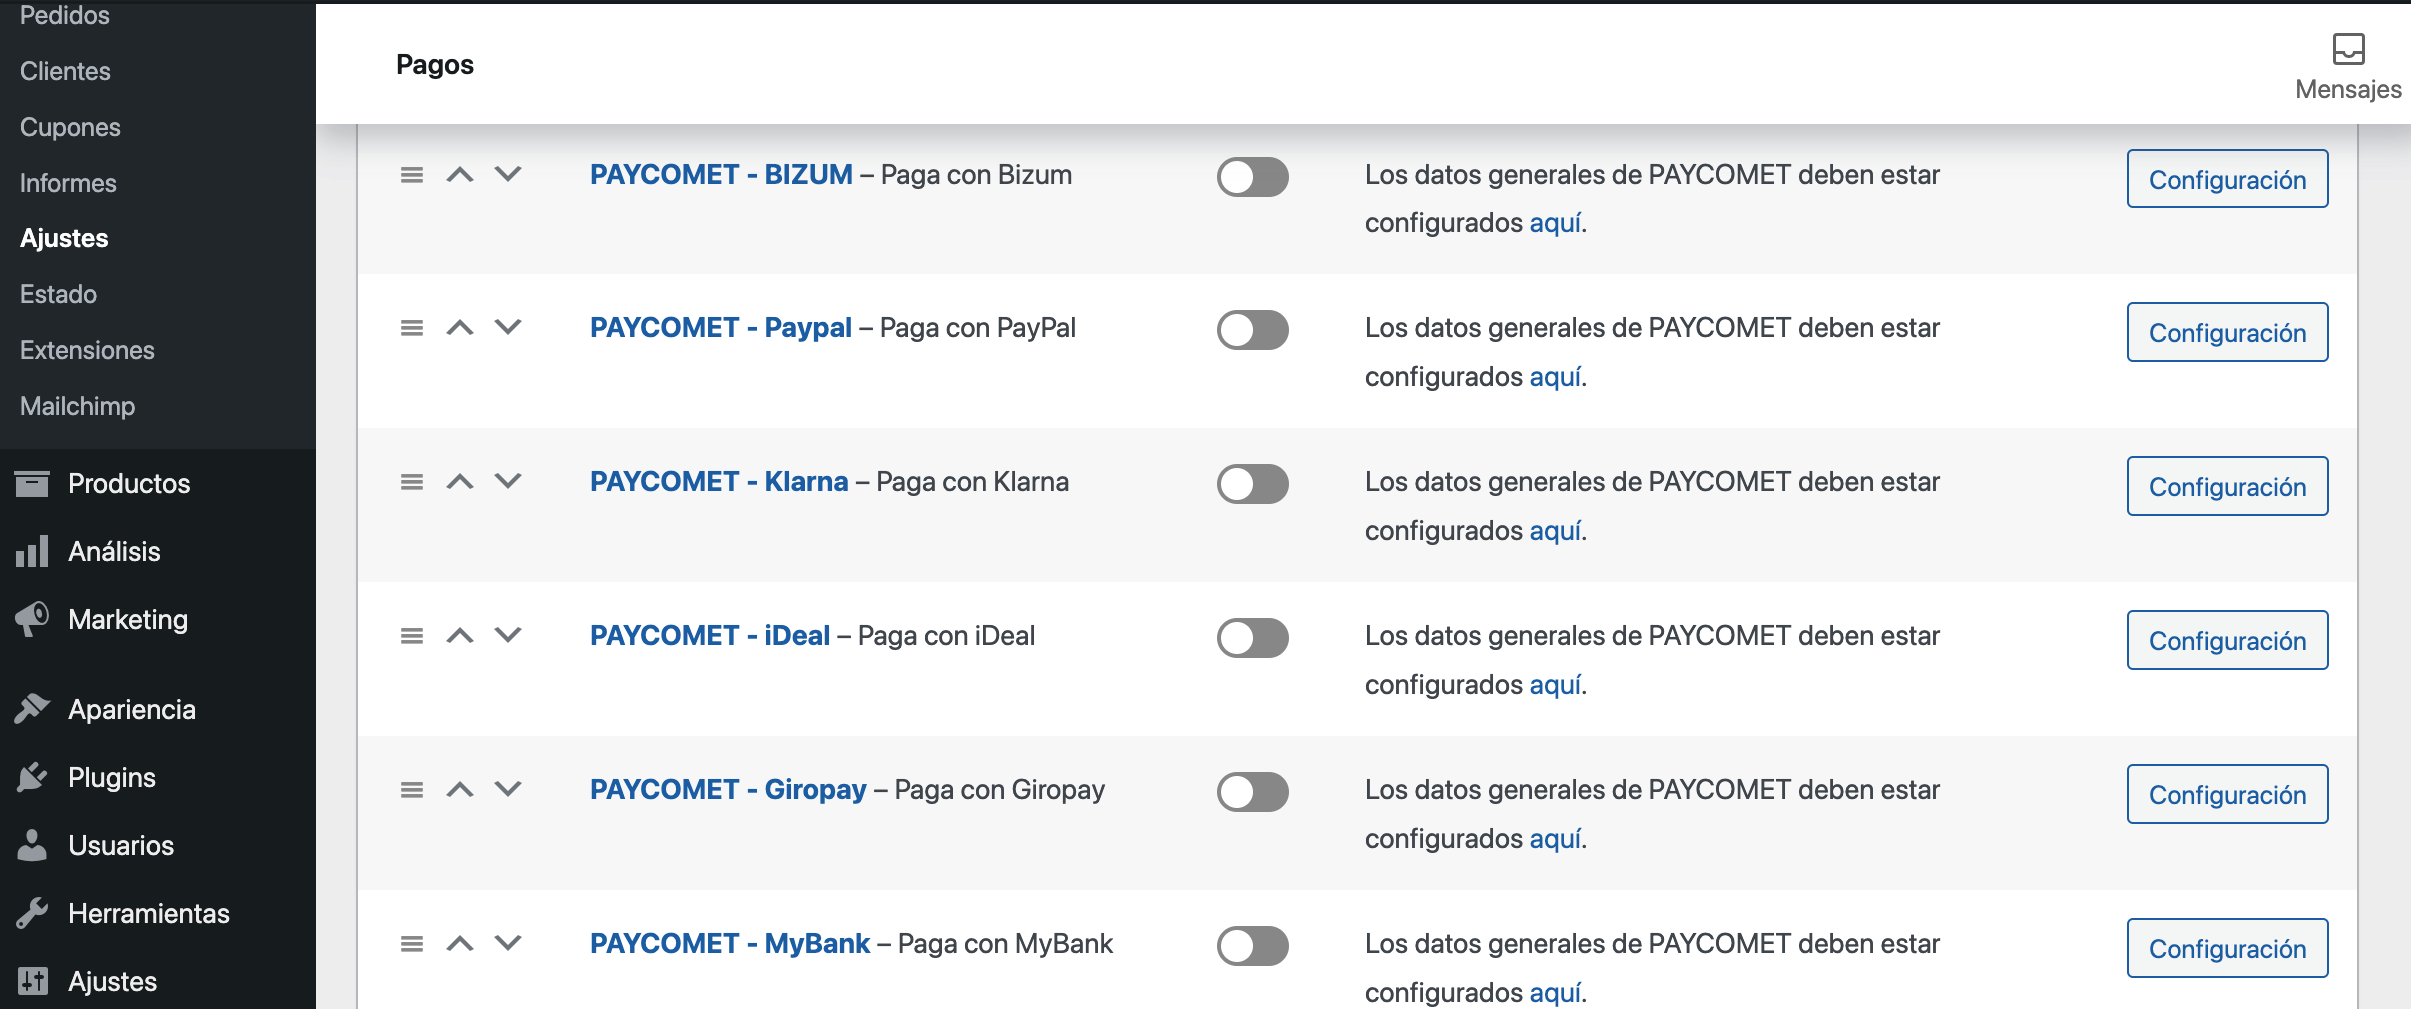
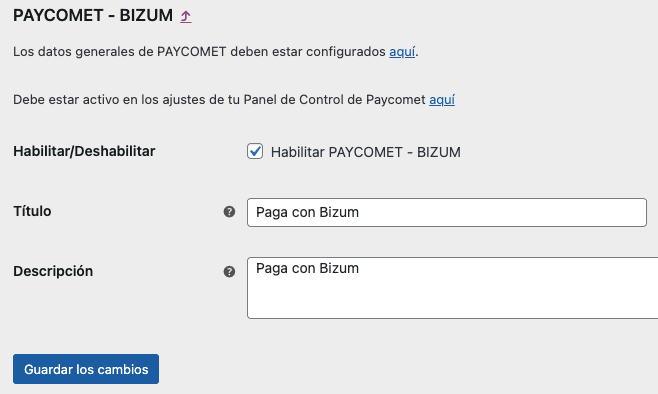
By clicking on the Activated selector, you can activate all the APMS you require.
The configuration parameters are as follows:
- Title: Name of the payment method that the customer will see in the checkout process.
- Description: Descriptive text accompanying the name of the payment method that will be seen by the customer.
All APMS that you have correctly configured within your control panel can be activated.
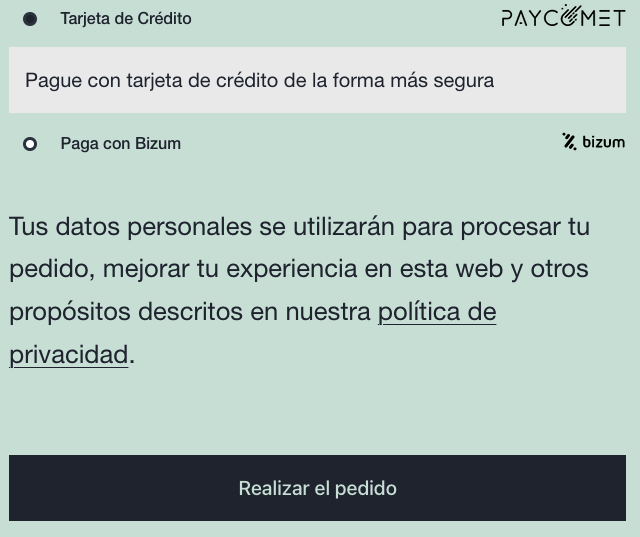
Place Order
When making an order in the WooCommerce store, “(PAYCOMET) credit card” will be shown as a payment option.
- Jet Iframe payment
If you have chosen the Jet Iframe integration, the customer could skip one step in the payment process, because the Jet Iframe will appear in the payment screen if the credit card option is selected as shown below:
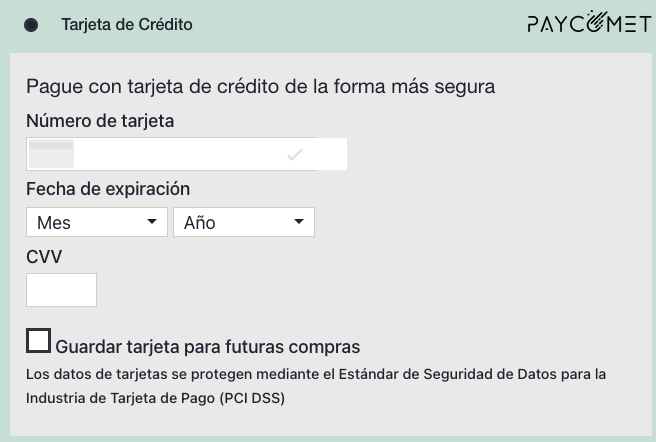
- Iframe payment
If it is the first time that you are purchasing it will have the following appearance
After clicking Make Order:
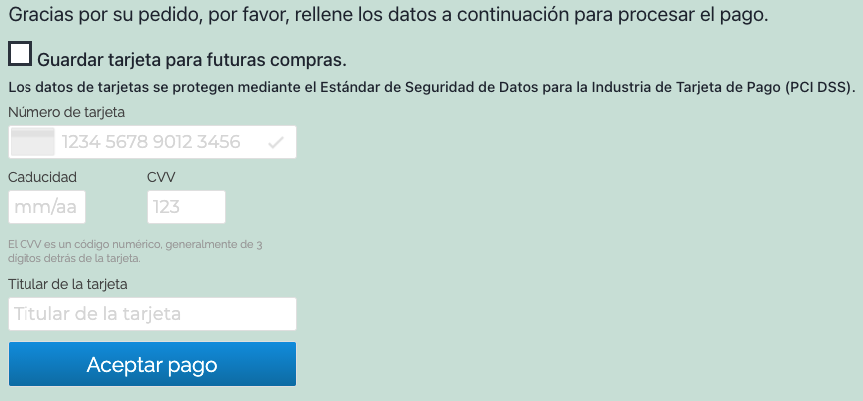
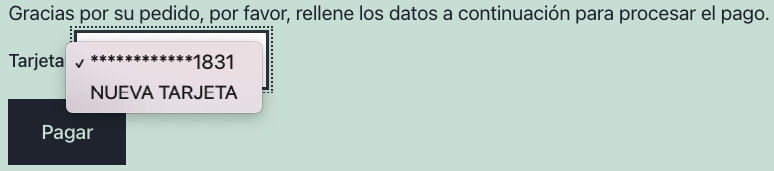
“Save Card”. Serves to save the token for future purchases. If we select this option, the next time that we go to pay in the store, the saved card will appear in Pay with Card.
Example:

By clicking Pay, this information will be verified and if it is correct the payment will be made and the order will be finalised.
If it is desired to pay with another card we will select NEW CARD so that the information to enter for the new card is shown.
- Subscriptions
The Module supports the payment of Subscriptions through the WooCommerce Subscriptions plugin.
It will process orders and the recurring payments for subscriptions.
Important
Subscriptions do not run on sandbox accounts.
Subscriptions can be scheduled, modified, and removed, but will not run on sandbox accounts.
Full or Partial Refunds
From the Order details in the Backoffice Full or Partial refunds can be made for orders made with this Module.
Click on the Refund button to display the refund options.

Full or Partial Refund:
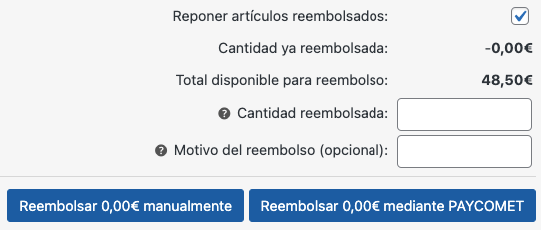
In the Order details, when it has been made through PAYCOMET the information indicated above will be shown. The amount to refund must be indicated in the Refund Amount field, clicking the “Refund XXX” button through PAYCOMET the refund of the indicated amount will be made.
If everything is correct, a Note will be created in the order with the result of the refund option on PAYCOMET.
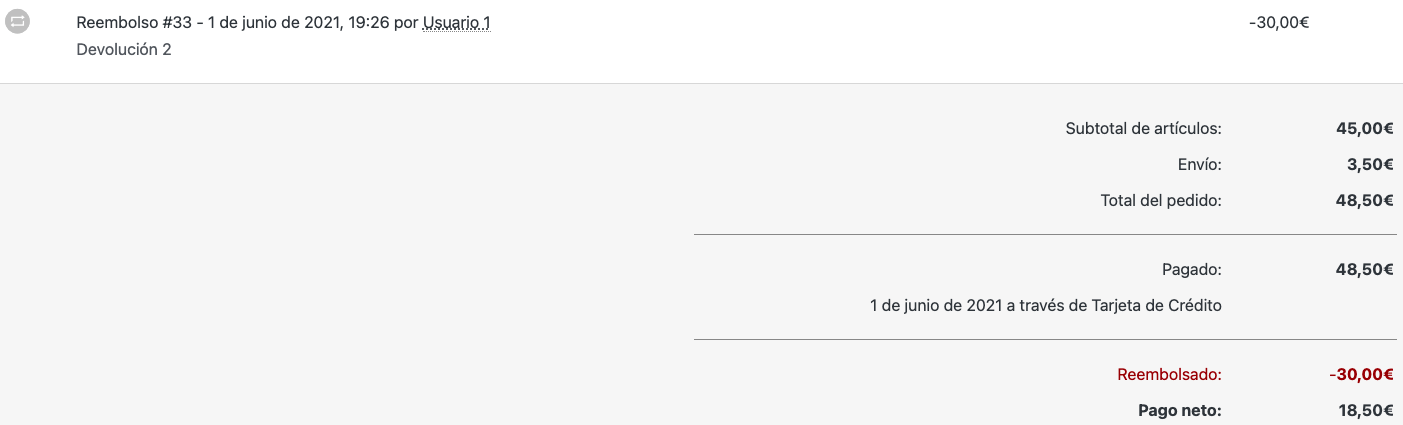
We will be able to carry out another Partial Refund of any amount or a Total for the Outstanding amount.
Thus, until the amount refunded is equal to the amount paid.
From the PAYCOMET panel, a Full or Partial refund can be made at any time.
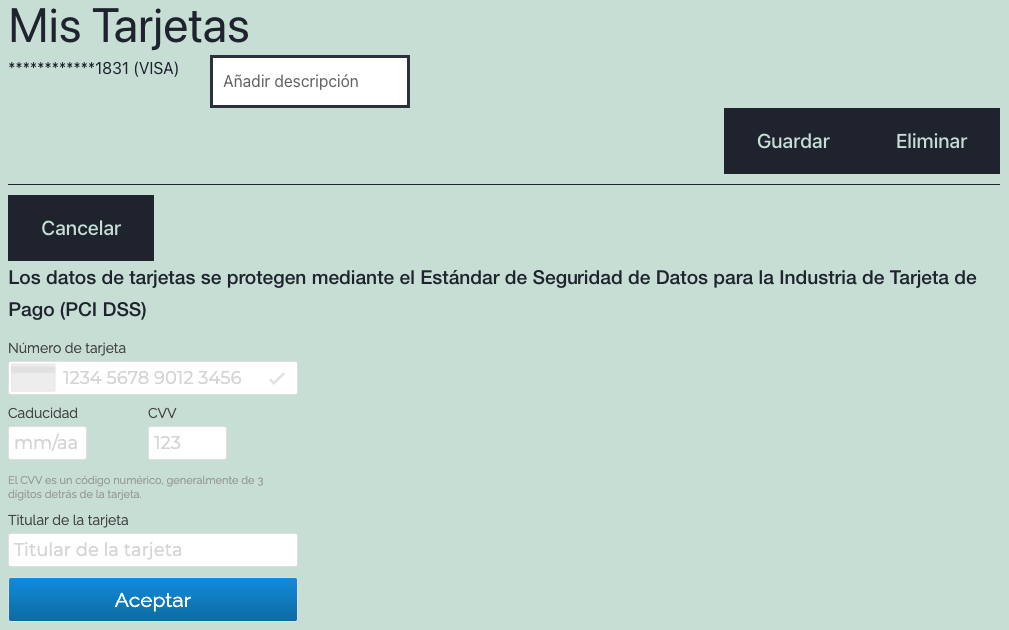
User Area
In the WooCommerce User Area, in MY ACCOUNT a new “My Cards” section will appear. In this area we can See/Create/Remove Tokenised cards

My Cards
- Save: Serves to save a description associated with the card. (e.g. Personal Card).
- Remove: Clicking this option will remove the tokenised card.
- Link Card. New cards can be linked. Clicking this option will show the fields for entering the information for a new card.
After clicking on the Link Card button, you can enter your details.
Important
If you have activated the configuration option "Disable Card Storage" the section "My cards" and the option "Save card" when making a payment with a new card will not appear.