Magento PAYCOMET Module
Download Link
The module can be downloaded from the following link: Magento 2
Installation
Install the PAYCOMET Magento 2 composer package
composer require paycomet/payment
Enable the extension in Magento 2
bin/magento module:enable Paycomet_Payment --clear-static-content
Setup the extension and refresh cache
bin/magento setup:upgrade
bin/magento cache:flush
bin/magento setup:di:compile
bin/magento setup:static-content:deploy
Enable and configure the extension in the Magento backend under Stores > Configuration > Sales > Payment Methods
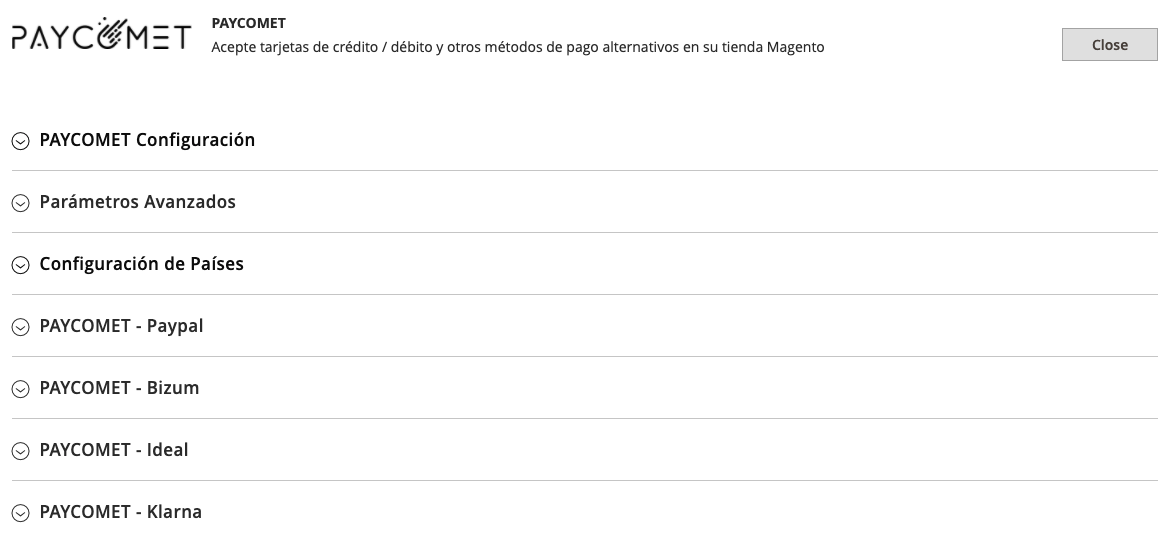
Module Configuration
PAYCOMET client area
Important
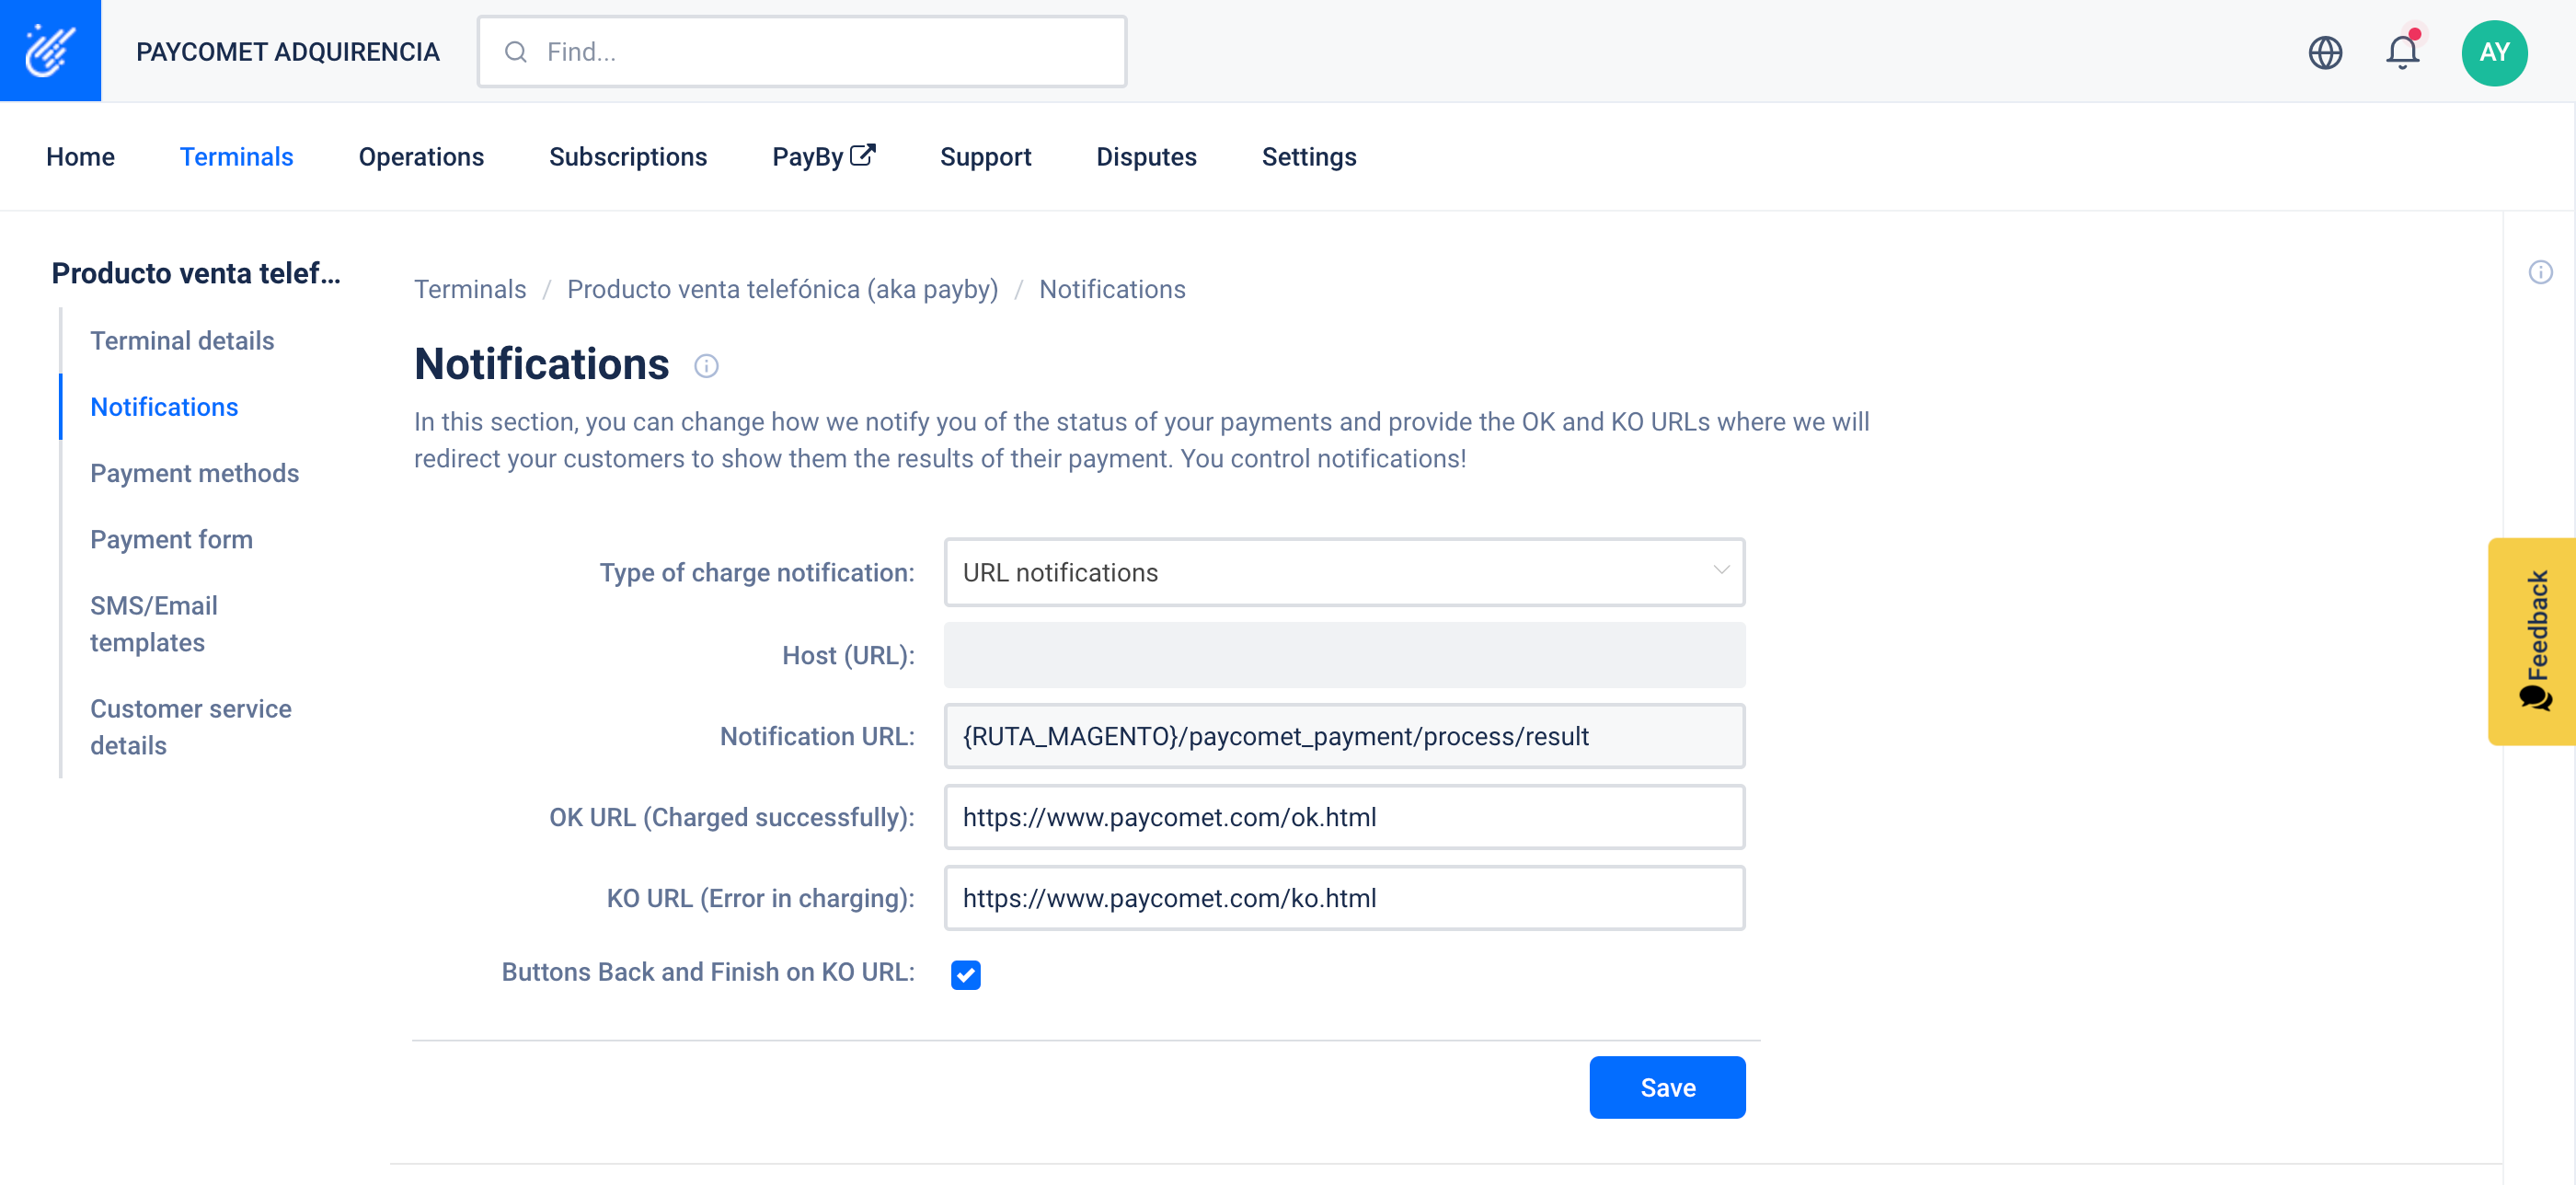
So that everything operates properly, it is VERY IMPORTANT to configure the next options on your client area. You must setup the following info:
- Type of charge notification: select Notification by URL or Notification by URL and by email.
- URL Notification: insert the following:
{RUTA_MAGENTO}/paycomet_payment/process/resultReplace {RUTA_MAGENTO} with the URL of your store.
Magento 2
Below the PAYCOMET Module configuration is explained for Magento 2.1.9
When we install the module on magento, in CONFIGURATION ->SALES->Payment Mehtods a new “PAYCOMET credit card” option will be shown.
It will have the following appearance:
PAYCOMET Configuration
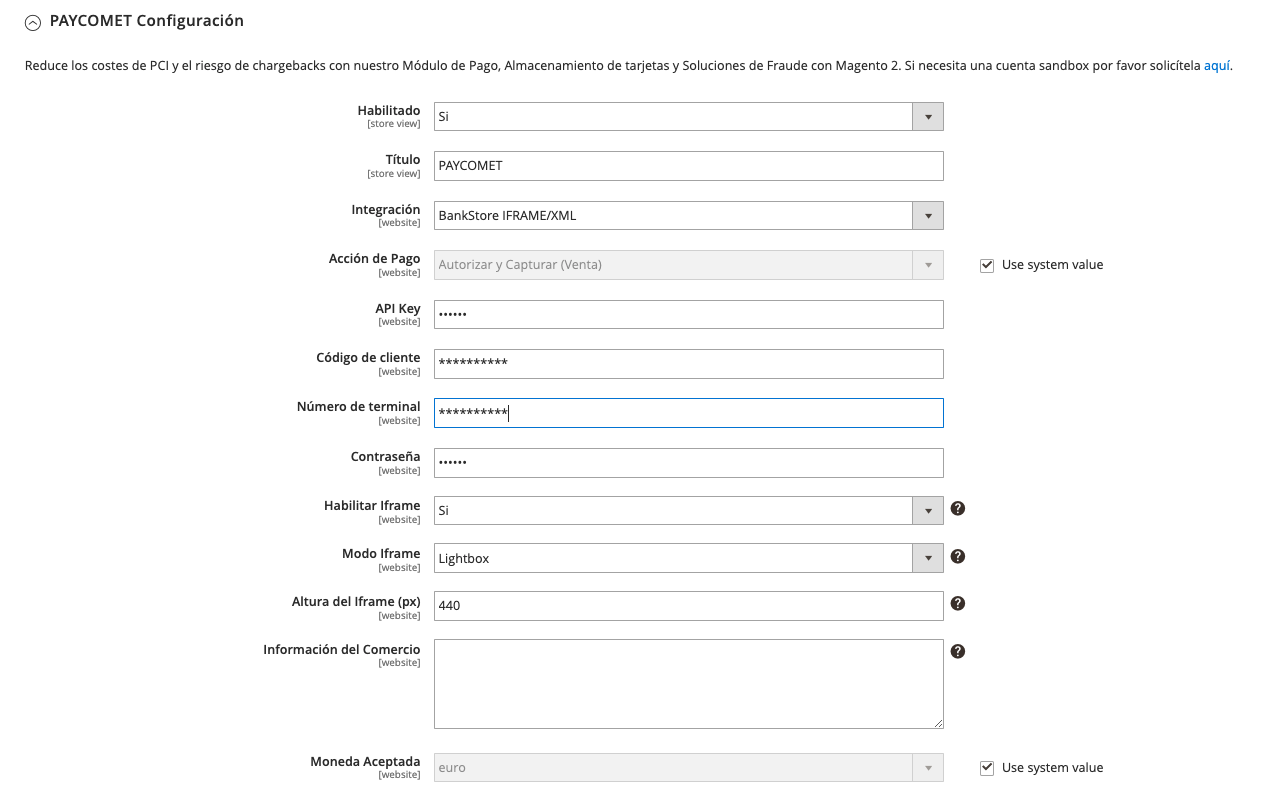
Firstly, the fields must be completed, provided in the product configuration of the PAYCOMET client area. These fields are:
- Title: Title in Checkout for Payment Module
- Integration: Allows you to choose where the checkout will be displayed. "Bankstore IFRAME/XML" will display it on the same page of the merchants website, without a redirect. "Bankstore JETIFRAM/XML" will appear directly on the checkout screen.
- Payment Action:
- Authorize and Capture: Is default option. The user is automatically charged upon completion of the purchase.
- Authorize: A pre-authorization of the operation is performed to capture the funds to the user. (See Preauthorization section)
- API KEY: It is necessary to include the Api Key that you have generated from your control panel. In the following link you have the information to generate it.
- Client code
- Terminal Number
- Password
- Enable Iframe: The Iframe is displayed at checkout and contains the payment form. If not, you are redirected to PAYCOMET. If disabled, contact PAYCOMET to activate FullScreen.
- Iframe Mode
- Lightbox: The payment form is loaded in a window
- Embedded: The payment form is displayed within the payment method
- Iframe height (px): Height for the payment form iframe.
Advanced Settings
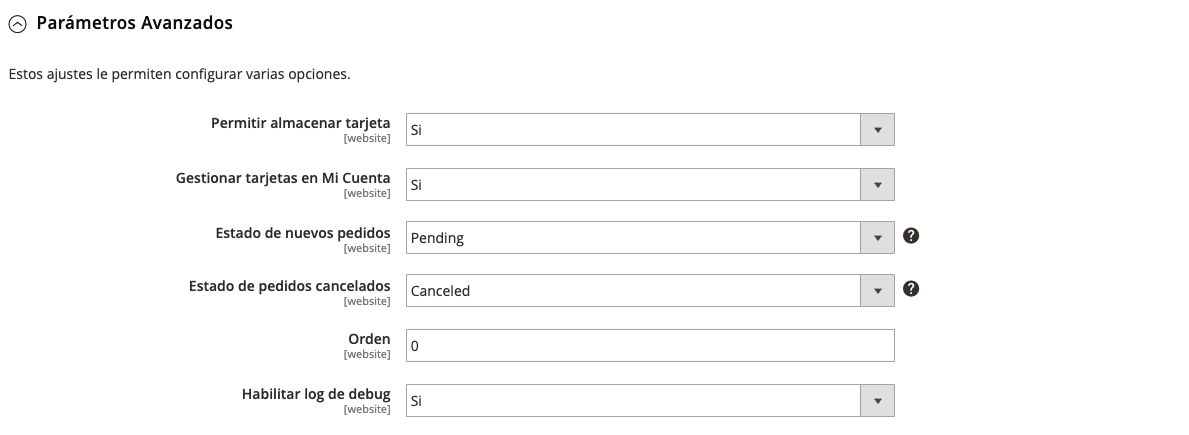
Configure Advanced Settings of Payment Module
- Offer to save card: If it is activated, the user is given the option of saving cards for future purchases.
- Manage cards in My Account: If you want to give the option to the user to manage the cards in your account.
- New order status: Initial status for orders before the response from the gateway.
- Cancelled order status: Status for canceled orders.
Country Specific Settings
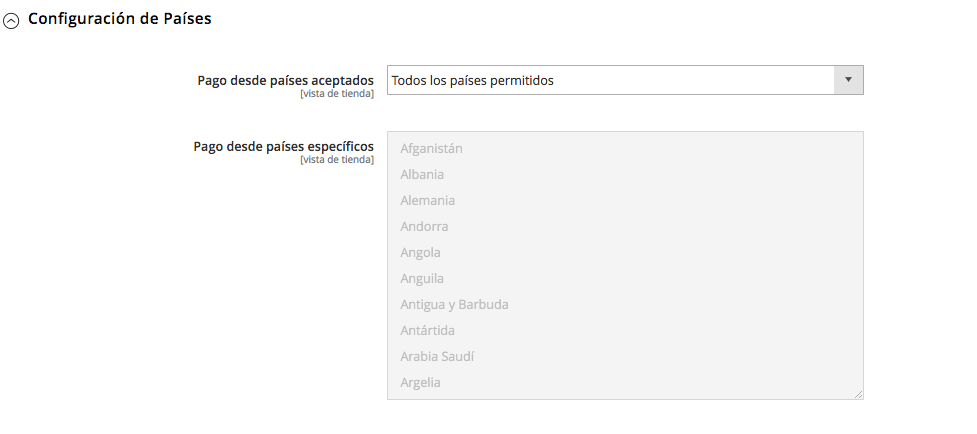
From here you can configure the countries for which this payment method will be active.
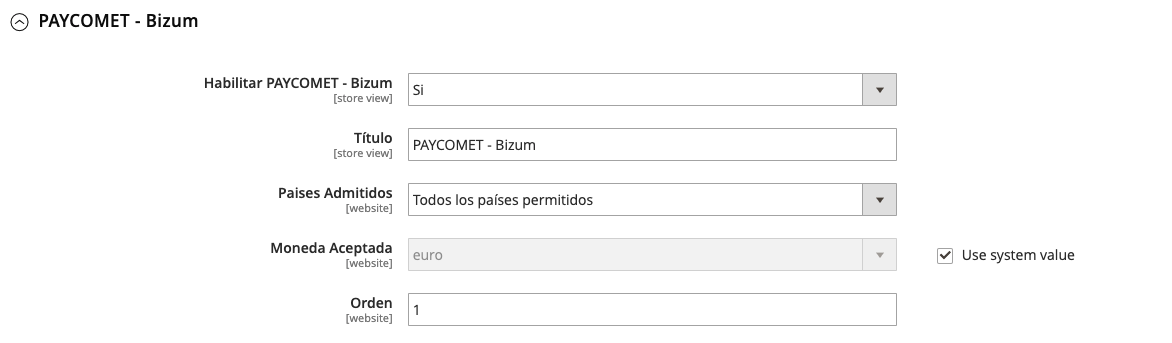
APMS
The last sections of the plugin configuration correspond to the different APMs that can operate through PAYCOMET. The client must have the different APMs that they wish to use enabled in their PAYCOMET product.
APM configuration example - Bizum
Make Order
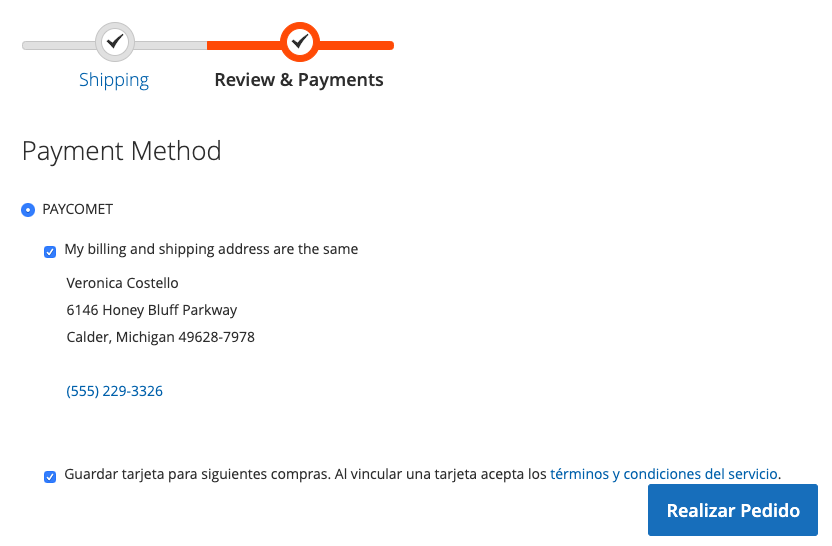
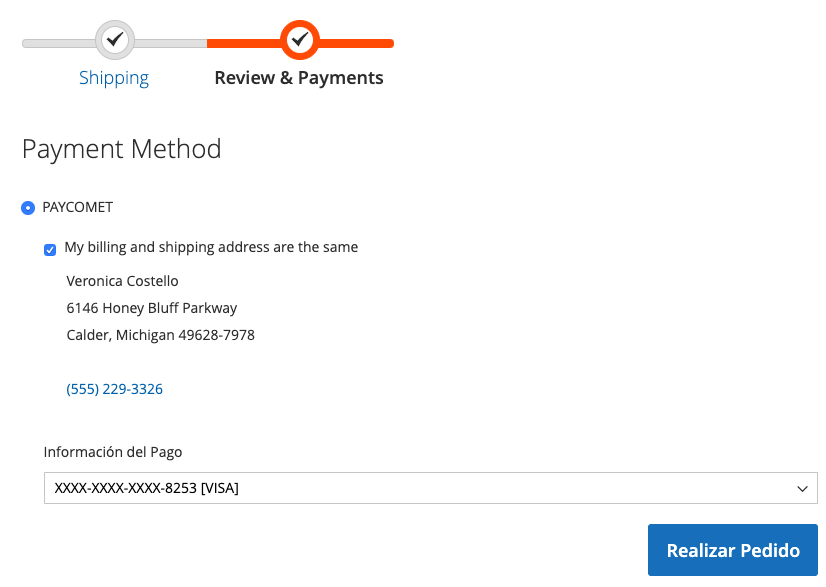
When making an order in the Magento store, “(PAYCOMET) credit/debit card” will be shown as a payment option.
- NORMAL PAYMENT: If it is the first time purchasing, it will have the following aspect
The card information must be completed.

“Save Card”. Serves to save the token for future purchases. If we select this option, the next time that we pay in the store, the saved card will appear in Pay with Card.
Example:
If it is desired to pay with another card we will select NEW CARD so that all the new card information to enter will be shown.
In case different APMs have been configured, these will be shown as new payment options at checkout so that the customer can select the payment method they want.

Pre-authorisations
When is selected "Authorize" in Payment Action.
If "Authorize and Capture", the purchases of users will be automatically charged to the card of the user.
If Preauthorize is indicated, when the client makes the payment, a pre-authorisation is generated on the user’s card. This must be confirmed within the following 7 days, as after this date it is no longer valid.
Pre-authorisations function both for clients that have a Secure Terminal and for those that have Non-Secure Terminals.
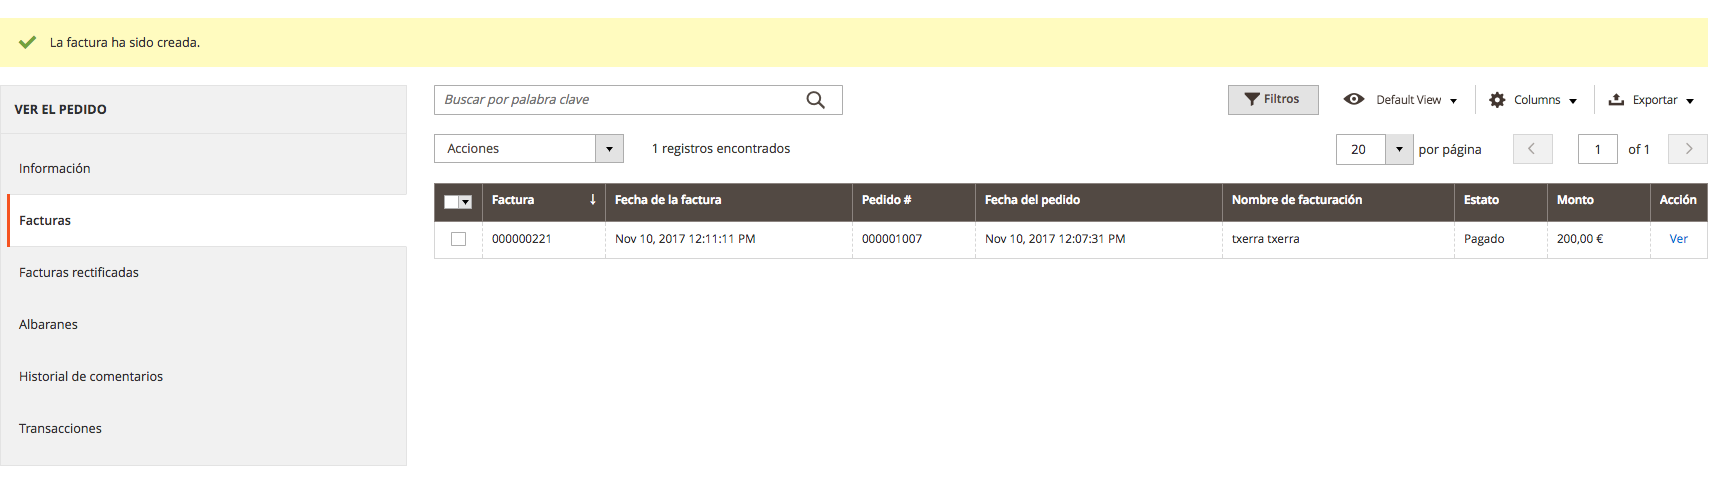
To approve the pre-authorisations, we must access the order and create an invoice on the generated order.
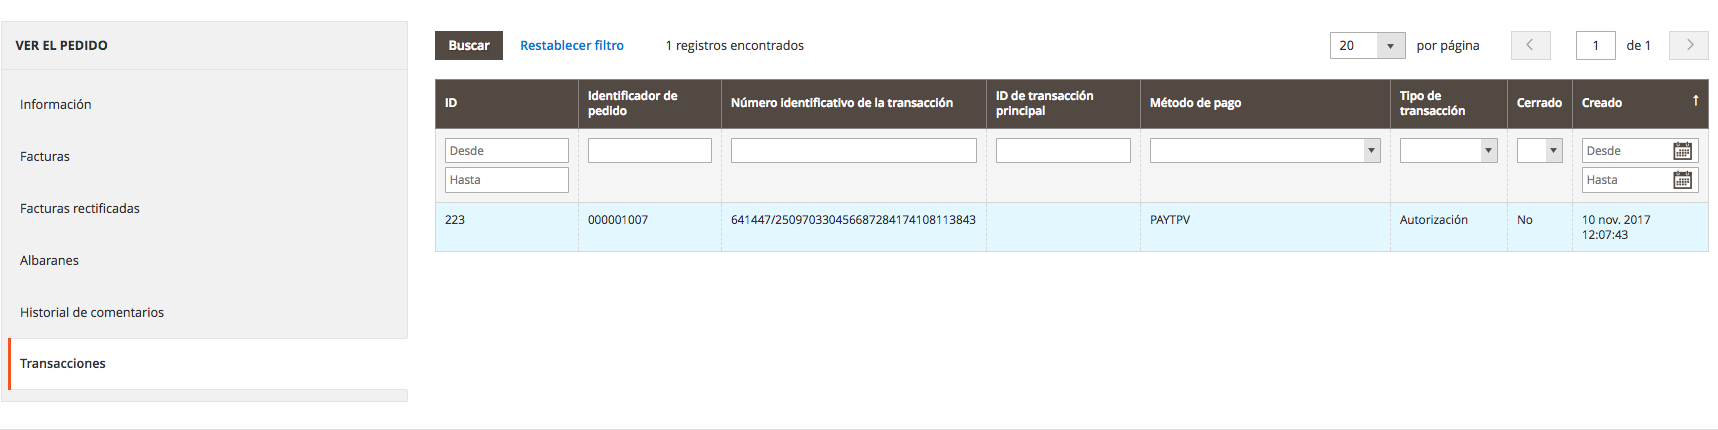
It can be seen that there is an authorisation transaction.
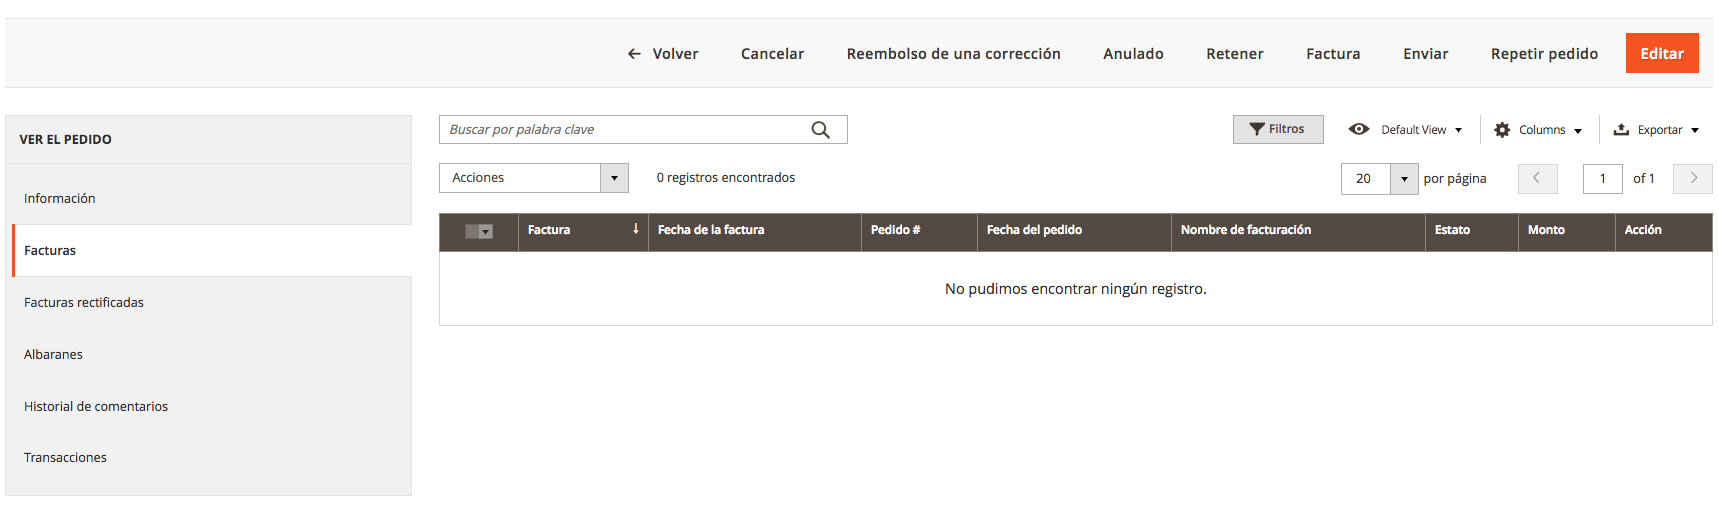
We access the Invoice section and generate a new invoice:
In the lower right section we see the “Send Invoice” button. We must select “Online Capture” in the Amount field to confirm the pre-authorisation.
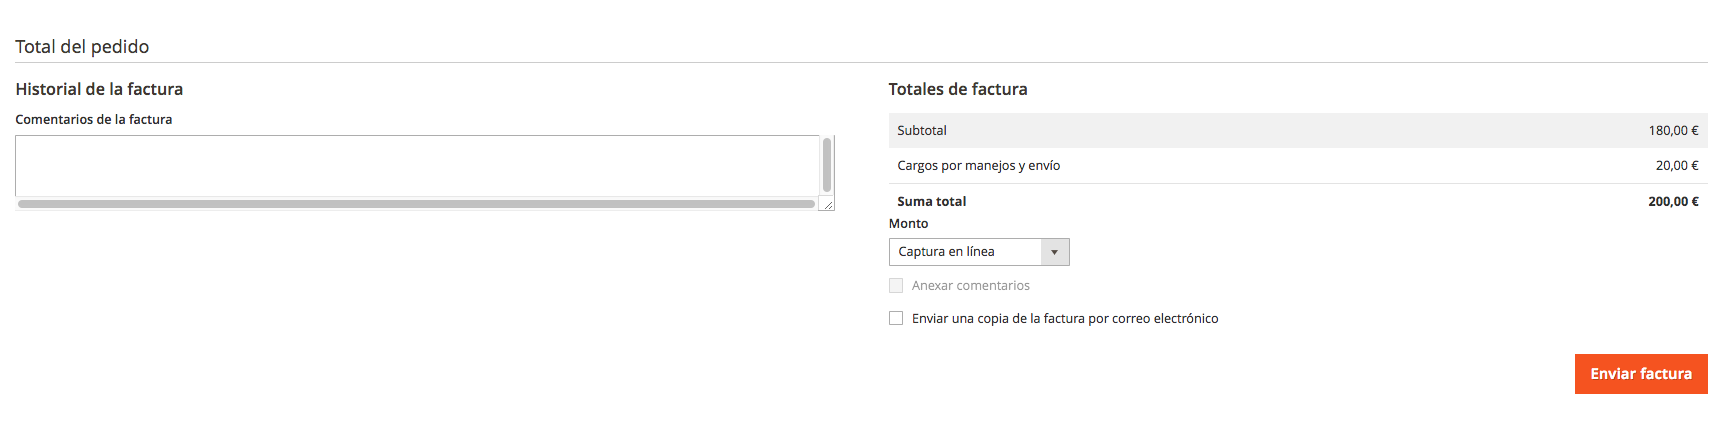
Once the button is clicked, the invoice is generated and the pre-authorisation of the payment from the client’s credit card is confirmed.
If we access the invoice section we will see that the invoice has now been created.
In the transactions section we will see the transaction of the “Capture”confirmation generated.
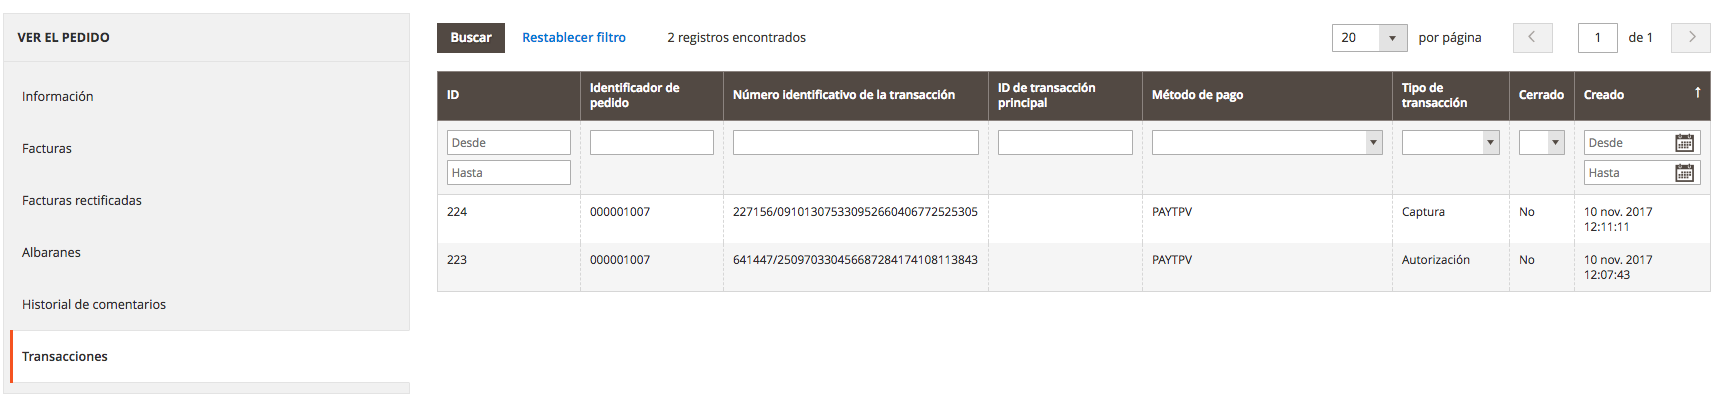
In the transactions section we will see the transaction of the “Capture”confirmation generated.
If you wish to Cancel a Preauthorization that has not been confirmed, you can do so by clicking on the Cancel button.
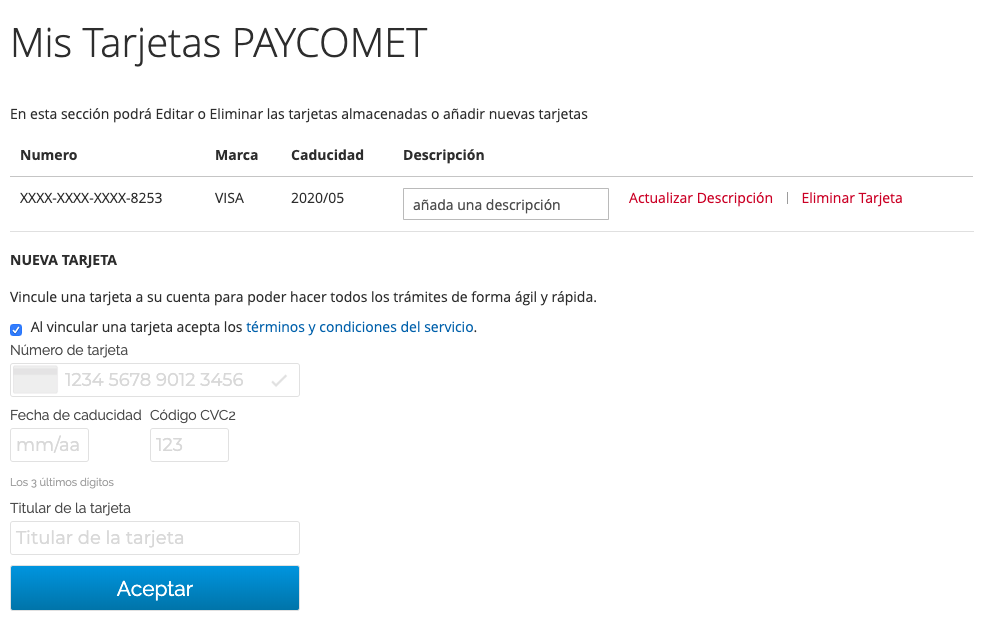
User Area
Within the Magento User Area, in MY ACCOUNT a new “MY CARDS” section will appear. In this area we can See/Create Tokenised cards.
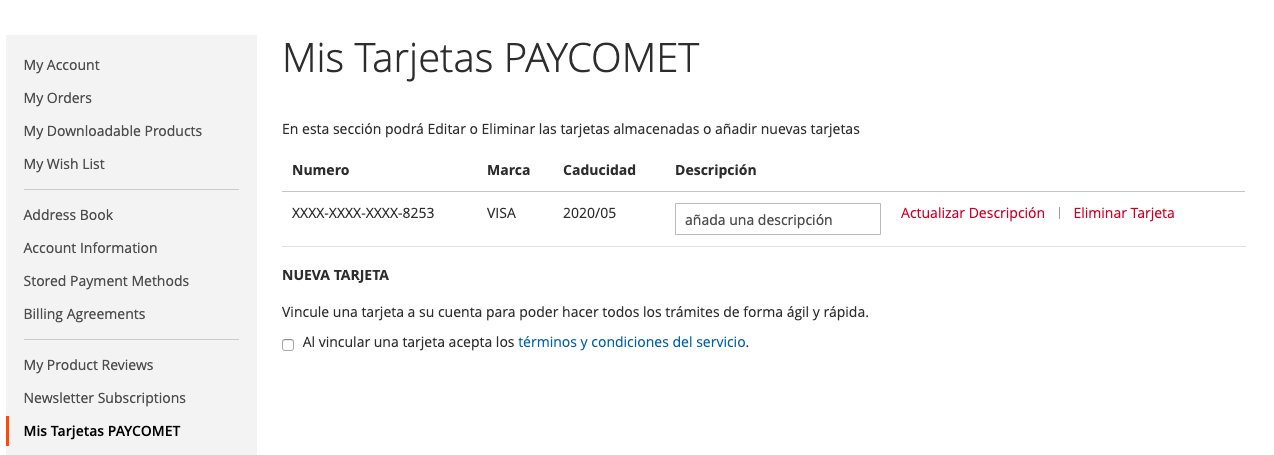
MY LINKED CARDS
Clicking “Remove card”, we remove the indicated card.
Clicking Update Description”, the description that we have entered is associated with the card.
Clicking on checkbox, we can register new cards for future payments.